
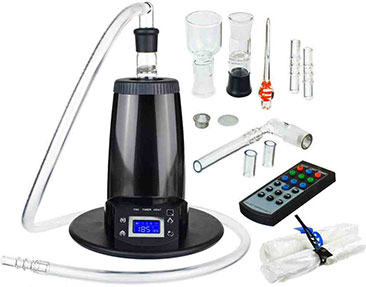
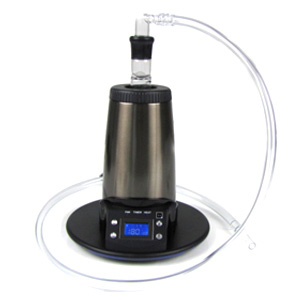
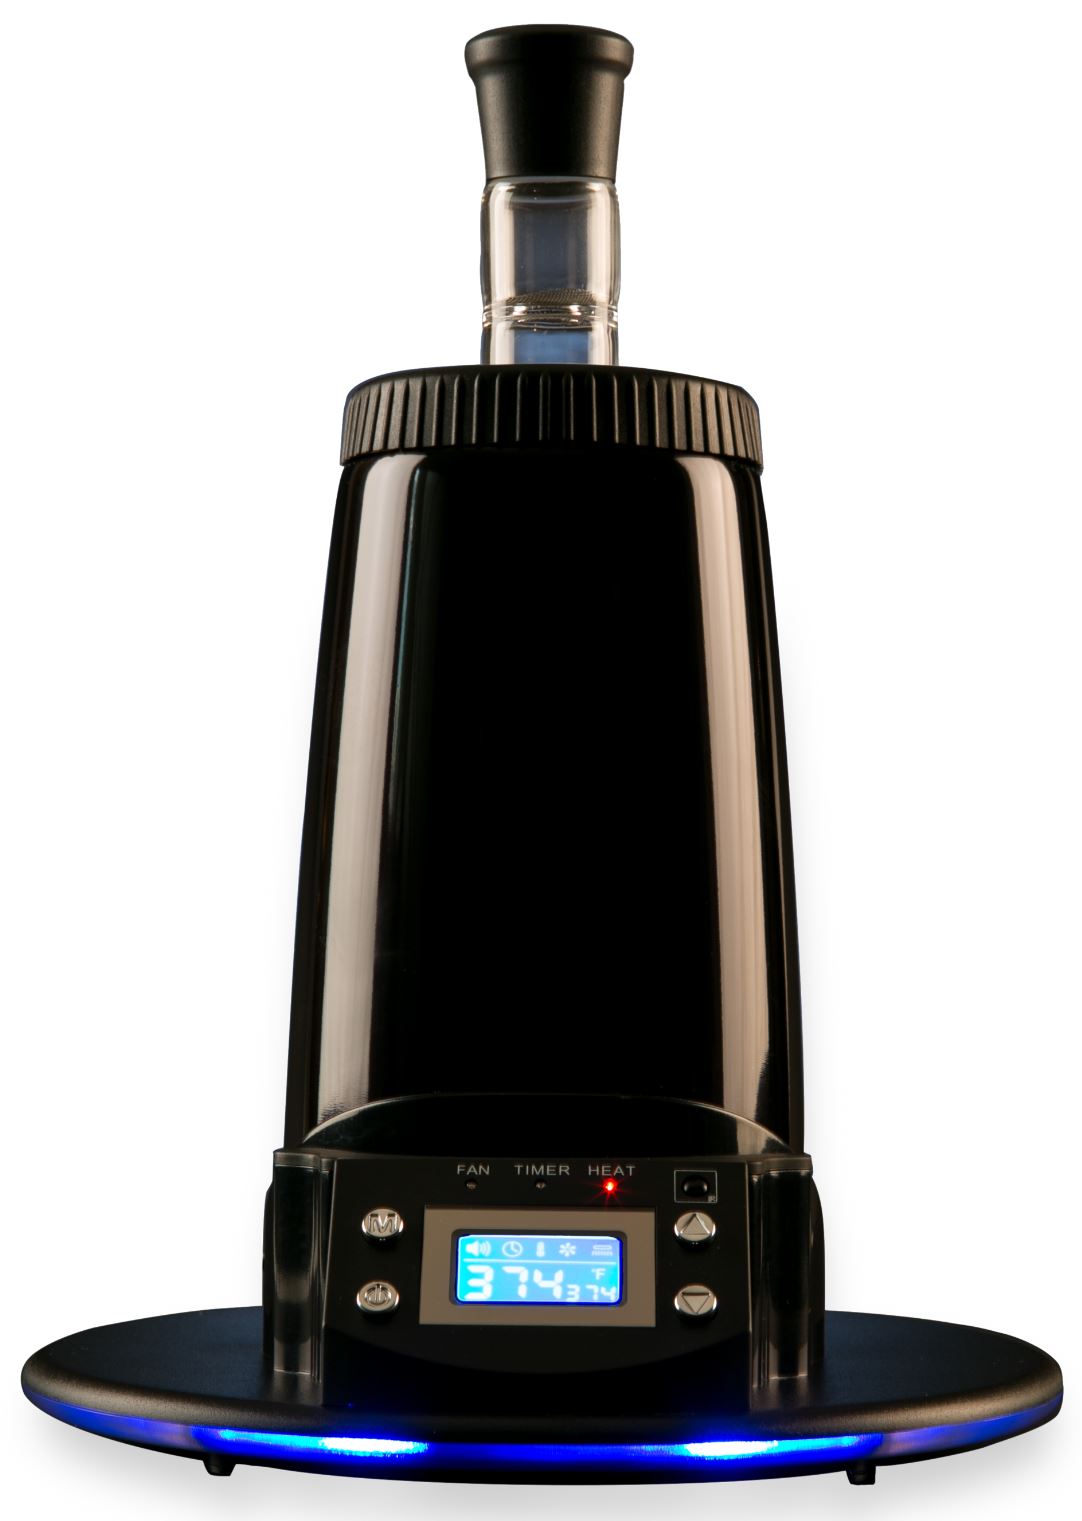
 This is the Extreme-Q, a dual-purpose desktop vaporizer meaning it can be used with a whip (a long tube) or with a big bag (balloon style).
I still consider this a good starter vape, or one that’s good for someone looking to experience multiple methods of vaping without spending a lot of money. It does have many glass parts, so you just have to be gentle with them and be careful that you don’t burn yourself, some of them get pretty hot during use. They also build up residue fairly quickly so to keep the vape looking fresh you’ll have to clean it regularly.
When using the EQ in whip mode you’re normally supposed to pack your material in the main bowl piece that sits on top of the heater, but I’ve achieved better results packing my herbs inside the elbow screen instead – if you’re not sure what I mean there’s a second video down the page a little bit where I explain in more detail. I also recommend experimenting with turning the fan on while you take your draw through the whip, as it seems to produce a larger volume of vapor that way.
In balloon mode, the bags are filled in about 90 seconds on the highest fan setting, but for thicker vapor, you might want to wait a little longer and fill it up at medium fan speed. Once the balloon is full you’ll have to keep your finger over the mouthpiece opening so that no vapor escapes, because this vape doesn’t have valves on the bags like the Volcano does.
Stay up!
-Bud
This is my Original EQ Review from Many Years ago
- The first thing is that when you first get this and you take it out of the box and you set it up, before you even think about vaping out of it, you want to turn it on, turn the heat up nice and high and let it just sit there for about maybe 15 to 30 minutes just to let any residue, like from any oils or chemicals used during the manufacturing process to burn off so that you don’t inhale any of that crap.
- So, you can take your handy remote here. Hit the power button, then you can hit the 200 button on the remote, and what that’s going to do is set the unit at 392 degrees Fahrenheit. That leads me to my next tip. If you take the time to read through the manual they give you, you’ll notice that there’s a section that talks about the core temperature of the heating element being slightly higher than the actual vaporization temperature up here where the herbs get vaped.
That’s an important thing to keep in mind because when you’re trying to figure out what the best temp is for you to vape at, you need to take that into consideration. I’ve been using mine set at 392 on the unit, so 392 is the temperature of the core heating element and when I put the top piece on here where the herbs go, I’m assuming the temperature to be about 20-30 degrees lower up here.
Unfortunately, they don’t tell you exactly in the manual what the temperature difference is, I’m just taking an educated guess, but 392 seems to work pretty well. The first thing you might notice when you turn it on and set your heat is that it gets up to the temperature you set pretty fast. For instance, when I turn mine on and I set it at 392, the screen tells me that it got to that temp in about 20 seconds.
Just keep in mind that it’s a little deceiving because what I noticed is that even though it says it reached the temperature if you just put this piece on and put some herbs in and, for instance, take your whip and put it in and try to start taking hits, 20 seconds after turning it on you might not get really good hits or you might not get anything at all.
Quick Tips
I found that once it reached the temperature I set if I put the top piece on with the herbs I put the whip on and then I let it sit there for about another minute or two before I start vaping, that’s when everything really seems to be at the proper temperature. Just keep that in mind when you’re setting yours up if you get it, to set your temperature, set up your top piece with your herbs, and then just let it sit for an extra minute or two to warm up and it will perform much better for you.
 So when you’re using this as a whip-style vape, once it’s warmed up and you have your herbs in the chamber and it’s ready to go, you can just hit it like this, nice and slow, and in between hits you might just want to take a look at the end of the mouthpiece here to see if any vape is coming out. You might want to keep your finger over it when you’re not actively hitting it just to make sure nothing escapes or anything.
If you feel like you’re not getting enough this way you could take your remote, and you could actually turn your fan on low and then start inhaling it with the fan helping to blow the air through. So, just experiment on your own and figure out which way works better for you, with or without the fan on.
Just another quick tip to keep in mind about this vape. It has glass pieces up here at the top, so just be careful that you don’t accidentally grab these when the vape is on because they do tend to get a little hot. So, you’ll notice that included with this vape is a glass stirring tool.
What you’ll want to do with this is during a session you’ll want to pull off whatever top piece you’re using here and just mix around your herbs a little bit, and this just helps ensure that it all gets evenly vaped and then you can put your piece right back on and start hitting it again.
Whip or Balloon?
Now, if you want to use this vape with a balloon you can do that, too. What you would do is instead of putting the whip on, you would put on this little piece they give you instead, which is basically the same top piece as the whip, but just a short piece of a tube instead of a long piece.
- Then, you’ll take the balloon they give you with the mouthpiece already attached here, and in case you’re wondering what this is, this does not come with the vape, this is my TV remote and I forgot to take it off my table. So, you would grab the mouthpiece of the balloon and you would fit it inside the tube here.
- The next thing you would do is you would take your remote and turn your fan on high or Level 3. Now, to completely fill the balloon with Extreme-Q it’s going to take about 90 seconds, so I’m going to turn the fan on and then I’m going to fast forward a few times just to shorten it up.
All right. So, you’ll need some extra space on the side of the unit so that you can lay your bag out like this. It’s about a quarter full now. Now, it’s about half full. This is about three-quarters full and this is what it looks like when it’s full. So, you shut off your fan now.
 Then, you’ll grab your bag and you pull it out of the tube here and you just put your finger on the end so no vapor escapes. Then that’s it. You can just start hitting it. Just remember to keep your finger on in between hits because this bag doesn’t have a valve or anything to stop the vapor from coming out.
Maintenance
As far as cleaning this vape, it’s fairly easy to do. You’ll notice right away what the problem areas might be or the areas where buildup will occur. These top pieces here, the one for the bag or the whip, might accumulate some buildup inside these glass pieces that you might want to flush out every few weeks with some rubbing alcohol.
Then, they also have a little screen at the end here that’s removable. You can pop the screen out and then you can also clean this with rubbing alcohol. The top piece here that holds the herbs you can clean pretty simply by just throwing it in a Ziploc with some rubbing alcohol and just remember to shut the power off on the vape first and wait a few minutes before you try pulling this off because it gets a little hot.
Also, if you’re curious about the remote, you can do basically everything you need to do here. You can turn the unit on and off. You can turn the blue LED light around the bottom on and off. You can turn the sound on and off. It has the three fan settings as I showed you before, and then it has six temperature presets on here and also a plus and minus button to fine-tune the temperature.
Then, it has a couple of buttons to set the timer on the unit. So overall, it’s a pretty cool vape and also if you want to see a comparison of the Extreme-Q with the Volcano, just so you’ve got a good idea of what the differences are, I have a video for that, too.
So as always guys, thanks for reading and I’ll see you later.
Good device before it breaks-down….KEEP YOUR RECEIPTS – you’ll need them for any support….service/support will not help you one bit if you can’t prove you purchased it….Terrible support!!!!…..will drag you down until you just give-up….I’m on my 3rd. unit in 5 years..two previous units all failed and to date the company has done nothing, nada. The control panel buttons fail!!!! – The support team suggested I ‘clean’ the button’s….gee, Why didn’t I think of that – F-off. So, you may ask, Why would I buy another one??….when they work, they work well….just up until the control button’s fail. I’m hoping (fingers-crossed) that this 3rd. unit lasts longer than a year…..God forbid I have to contact ‘support’…so lame!!! You’ve been warned!!!
Just in case anyone still reads this, I’ll put in my two cents. Number one rule: preheat, preheat, preheat. Start by getting yourself an oven mitt. Now, pack the screen with that sweet, sweet jazz lettuce. Make sure it’s ground up nice and fluffy. Tun the fan on to 2- this helps pump hot air out of the chamber and through the glassware. Make sure you have attached for preheating all the glass pieces you intend to use: everything that will go between the chamber and your mouth, except for the balloon. *Do not put the screen with your weed in yet, and do not attach the balloon. Tell Siri to set a timer for 10 minutes. Pro tip: Go rub one out- masturbation will make the wait go faster. If you want to use a balloon, wait another 10 minutes. Pro tip: you could use this second 10 minutes to wash your damn hands, if you haven’t done so since you finished masturbating. *You disgust me.* Turn the screen with your weed upside down. If you’ve packed it right, nothing will fall out. Now, put on the oven mitt. Carefully remove either the whip or the elbow pipe for filling balloons. This glass should be piping hot now. Gently press the glass end of the whip or elbow down on the screen until the screen is wedged in there snugly. Now you’re ready to start tooting off the whip, or filling the balloon. You’ll get the best vapor in the balloon if you set the fan at the slowest speed. You’re welcome.
guessing
I just bought this unit and finished my first sesh with it just a few minutes ago. I like it.
One of the best things about it is that the glass bowl allows you to see when the bowl is finished without having to open any doors to any kind of compartment. No more
I put a rubber bite valve on the bag now it works flawlessly….
Hi Bud
I’m pretty new to vaping dry herbs and I’m finding your reviews to be very helpful. Thanks.
I’m thinking of buying an Extreme Q. Would I be correct in thinking that it’s an on demand, rather than a session vape? Also are all desktop vapes on demand?
Sorry if it’s a stupid question – as I said, I’m new to all of this.
Thanks again,
John
PLUG FOR EXTREME Q VAPE
A 7mm mechanical pencil eraser with a small screw sticking out the top works perfect to plug the bag. You can fill the bag, puff, plug, put it down, do stuff and come back and No leak. The longest i forgot about it was like 45mins. In my opinion, the last draw tasted the same as the first. EASY DIY Q BAG/BALLOON PLUG!
Later
Nice review. Thanks.
I inherited an Extreme Q and I love it, though I haven’t tried balloons, only the whip. I use many herbs in the vaporiser, if you are interested in aromatherapy and herbal medicine vaporising dried/cured herbs is much better for health and more efficient than essential oils as you can activate different components of the herbs at different temps, not just those components which make a pleasant scent. I think slightly moist works best, after all vapour is moisture – so don’t dry out your herbs. Vaping herbs is also far less messy than oils and I will often smoke the vaped herbs through a water piece after they are vaped out. Different herbs activate at different temps and many are fun to blend. There is loads of info out there.
I think people expect vapour to look like smoke, whereas I have found the vapour I get is almost invisible but still potent. It must be noted that my eyesight is terrible, though, others see it when I can’t, but to me it is still nothing like smoke, or the vapour I have seen from pen type vaporisers, but I believe they use liquids so it makes sense they’d be super cloudy.
I tried a 3 foot and a 6 foot whip, both I can draw without a fan. The trick is to draw really slowly for as long as you can and then hold it for as long as you can before exhale. Exhale through the nose to get the full taste and it will also absorb through your sinuses. But that is my personal preference, the best thing about this is how far you can experiment til you find what you like.
I elbow pack, the glass stirrer is shaped wonderfully at the large end to assist packing. You don’t have to mash it, though. I picked up some inexpensive 14mm screens to fit the elbow screen, which is great for some of the drier herbs I use or floral herbs (eg Hops, lotus flowers). Just pack the elbow bowl and pop the screen in on top to keep it all in the bowl. I also have a Boundless CFX which I use with an EVO bucket, I am thinking of trying one of these buckets in the extreme Q in place of the elbow screen, it fits the glass and it really seems like a great option for me for drier, lighter herbs.
I hope this is helpful to others. If anyone has any tips on harvesting the oil left in the whip and glass pieces before it gets there I would love to know. Thinking of trying one of those oil screens which look like steel wool in the glass elbow.
Thanks again, love your work, simple, direct and helpful advice.
For Best result make sure you start with hot glass. Preheat Glass cyclone bowl empty first. Run fan on speed 2, for 2-3min Temp 230c. Turn off fan, add ground herb .3-.5g. Lightly pack with thick end of glass stir stick. Attach elbow & bag(make sure that bag is open & airflow has little resistance, don’t overwork the fan motor, have bag outstretched and keep an eye on the process, daily use will resin up the bag and make it stick to itself, pull it apart to open it up.) Let stand with bag attached for 5-7 min. Drop temp to 200c Ensure glass joints are connected & turn on fan speed 2. Help the bag fill and keep it supported by hand or a Rig of your discretion & design. A MacGruber kind of thing. Allow the bag to fill and turn off fan when bag is 7/8ths full. Remove bag & use glass stir stick to block the glass elbow. Enjoy your bag of vape, use glass stir stick to mix & repack the bowl. Repeat bag filling process. Or attach whip to switch things up. Make sure screen is in place(if screen is loose & falls out try to pinch the screen mesh to reshape. Remember the hot glass & keep a heatproof pad for handling the hot bowl. This device takes patience to use and requires time to Enjoy. Add or subtract heating times & temps to alter results. Have fun with the extreme q but realize it’s a little slower to start and a little more finicky to use than the Storz & Bickle Volcano. Try both and go with what you prefer and what you can afford.
The Airizer Extreme Q is a poor man’s volcano. Having both, I can say that the airizer heating element is about 1/4 the size of the volcano’s. You get what you pay for. The airizer works well with very small amounts of dry herb, but it quickly gets bogged down by larger amounts. I don’t know why they sell this with bags because the fan is not powerful enough to inflate them. It only works with the whip where you can ‘boost’ the fan by drawing on it with your own lungs.
The quality doesn’t impress me, I expect this unit will fail in a couple years. The volcano has excellent warranty service, I don’t know how it is with this one but time will tell. It seems like its been made to be thrown out when it breaks instead of repaired.
Don’t trust this review.
I second this, do not listen to this guy.
It seems he is bitter that he paid money for the volcano when the extreme q performs just as well. So what that the bags take longer to fill. Plus the volcano has a plastic heating chamber, plastic mouthpiece, the extreme q has glass chamber and glass mouthpiece.
“POOR MAN”? Wtf dude.
Volcano = $600 VS EQ = $200
Bags = $8 for 1 VS Bags = $15 for 6
Plastic VS Glass
I’d rather buy herbs with the $100’s I save going with the EQ! Maybe if you got no patience to adjust things yourself, get the Volcano.
My bad Volcanos are more like $700
My airizer fills up my balloons just fine, I have both the volcano and extreme q, and I prefer the airizer, due to its price, and the fact that I can switch from balloons to whip.
I’ve had my Arizer for 6 years now and it works just fine. The build quality is excellent.
You can tell it’s bullshit when he says the fan is not powerful enough when people get bags of milky vapor from it.
Love mine! Perfect temp for me is 190 C and pack the elbow!
Very useful. Vape clouds!
Hello :) Thanks for these videos!
Maybe I’m doing something wrong but when I load my cyclone bowl to use my whip, when I start to inhale? All the bud from the cyclone bowl, even with the little screen cap on the whip, goes right into my mouth.
Any tips on what I may be doing wrong?? So far using the whip has been completely unsuccessful and I’ve been stuck with the bag.
Sounds like the screen fell out of the end of the whip
I have found that if you put your herb in the bottom half of the cyclone bowl and push a screen into the bottom so the herb stays in the bowl that you can make some real clouds at much lower temps because you just moved the heating chamber down close to the heater. Elbow packs are for fools lol.
How much material do you typically have to pack for a sufficient session?
yo vapecritic much respect for your reviews been hitting up the site for the past 4 years but got to tell you straight…was disappointed in this review and your endorsement for the extreme-q. bought it recently and boy it’s a POS-how could you give it 90/100 bro!? barely any vape comes thru the whip and the bag vapor is hella weak…seems others on youtube have same problems..overall its still a lot of $$ for a weak vape nd now have to buy a volcano … stay real bro
Just saw this come in, keep playin with it bro I promise you it’ll work.
This video is super old I’m sorry about that, I need to make an updated one, but make sure you do the elbow packing thing that I show in the second video on the page.
Also, I like to use the fan to help generate more vapor when using it with the whip, and with the balloon if you pack in the elbow and put the fan on low or medium it should milk up the bag.
Lemme know man!
Well i will say you were right in the elbow packing, i tried it again this time compressing the herb more in the screen and using level 3 fan found it to be a decent milkiness in the bag.
Overall I’m still a bit disappointed in the unit especially the whip- it really sucks compared to my old ViVape2.
Sorry if I came across rude and appreciate your reply despite it.
Much love from Ca USA
Its a poorly designed filling chamber with no plunger to keep the herb against the screen so the air flows through it. As I said in my review, its a poor man’s volcano. Just get the real thing. Its not overpriced, you get what you pay for.
I just got one too for Xmas and LOVE it. I had that same problem where the first bag or 2 there was little to no vapor. Then bags 3-5 were packed with vapor. If you put too much herb in it , it won’t give off vapor or it’s not hot enough. After it heats up to your desired temp, let it sit for a min or 2 then put fan on med nd should work great
I bought this from Planet of the Vapes, after about 2 months of very regular use from 1 guy. Smoked about 1 1/2 ounces through it and now it’s no longer producing hits. It is still heating up but not doing anything for hits. Wouldn’t purchase this if my life depended on it. Many better vaporizers out there, it’s great while it works but if it quit working this fast. I would definitely move on to something else.
I agree yet for different reasons, its a cheap entry level vape. Save your $$$ and go for a Volcano
I’ve had mine for 2 years. Works perfect.
I would highly recommend getting a DDave mod kit for this. It greatly increases the performance. I only use the short 18mm adapter but you need the stem in the kit to use it as it replaces the elbow. If you contact him directly he has been willing to provide 2 short adapters and forgo the taller one.
ddavemods.com/store/p2/The_DDave_Mod_V2.5_for_Arizer_EQ_%26_VTower_Vaporizers_-_%2818mm_Only%29.html
One of the best vaporizers I have ever owned, I was so satisfied with it I bought a second one! The only thing I dislike with this vape is the fact there is no valve on the balloon. It’s really not a big problem if you suck it down quick, if not it gets quite annoying to hold espiceally if your using it with a friend. The whip works great espicealy if you kick on the fan! I have honestly never had a problem with it in over a year. I highly recommend it if your not trying to break the bank, I purchased my new one for $140.00 off vapor nation. Love everything about it, espiceally how simple it is to use with the remote. Just be careful with the glass and everything will be okay. Have thought about getting the all glass stem for balloons, and the tuff bowl, maybe one day. Hope this helps someone make an informed decision, it’s worth it!
I bought this today and it has been a hassle since I got it. I did everything exactly instructed, it heats up but does not provide ANY HEAT to the herb. Get something else.
Yup, dont’t be fooled by marketing trolls…
The Extreme Q is great for several reasons but 2 really stand out for me.
1)It works great but (and I hate to say this) don’t follow the instructions and pack the elbow screen instead (I use about 1/8g per session(4 good rips)). Set temp for 200C-220C and go (takes about 2min to heat up)(any higher and you risk burning the herb and releasing the bad stuff that comes with combustion). Thick vapor clouds and then save the used herb (toasty brown and smells like roasted peanuts) for making tinctures. Clean the whip and elbow with everclear and add to tincture.
2)3 year warranty and Arizer has great customer service. My first (2010) one fried a week after the 3 year warranty (used daily for those 3 years)and Arizer still sent me a new one(used daily for 3 more years). I just bought another one. Why instead of a newer design…..show me another vape that you can use daily for 3 years and have zero problems.
Since there is no combustion, there is almost no leftover smell which keeps your home from smelling like an herb farm. Cools down in 5-10min (even the heater end) and with good insulation and a shut off timer, it is very safe.
I absolutely agree R. I’ve had mine for at least 3 if not 4 years and have never had a problem with performance. and it has even traveled with me. I’ve broken glass by my own fault, I finally just had to replace the second bag that it came with, only thing that I’ve had an issue with is the plastic ring around the top of the base unit has pieces fell off because it’s plastic but it doesn’t effect the performance. I’m actually debating about buying a new one just to see if they were even able to improve it since it works so well already.
Really informative review, thanks!!
The elbow pack tip works extremely well. I am very satisfied with this method of vaping. I use very small amounts of material and get enormous amounts of vapor.
I am having a problem with my Pax 2 vaporizer. I don’t get near the vapor quantity you seem to get and I find that the Pax 2 burns my lips every time I use it. Do you have any tips for the use of the Pax 2? I spent a lot on this portable unit and am extremely dissatisfied with the experience.
I found with the pax 2, if you pack it tightly like the original pax(even though instructions say not to) I promise you will get the desired pull and vapors you want. Pack it tight and set it to the second heat setting. Nice clean, smooth vape.
Hi Bud
I just tried something with my Ekstreme q that brought efficency up a little.
Mabye its been tried before.
anyway I took a small screen and made a dome on one of the dome screens.
So the herb does not collect in the dome but instead whirls in the bowl.
You should try if you have not already.
Regards
I just got my Extreme Q 5hrs ago and I’m impressed. It’s more compacted than I expected, good thing. I do wish the power pack was built in but this way it does give you a long cord. It burns efficiently and quietly. Using the fan while using whip is great.
I paid $134 for the Extreme Q. The Volcano is 3-5x more expensive and is limited to just the bag, that’s nuts. Ok volcano might last longer but If I have to replace It out of the 3yr warranty (lifetime on heater) I can buy 5 of the Q’s and still be ahead.
Having a remote seems dumb but it’s really handy. The unit heats up very fast and raising the temp once warm is almost instant. The presets are nice and it’s real easy to tweak the temp from there if needed. I usually do on any vape I’ve owned.
Filling the bag is fast enough. If you’re jonesing that bad that you can’t wait an extra minute or 2 use the whip and get help. Seriously there’s no reason to spend a penny more.
Great video as usual!
Well I must say as a newbie and searching many videos on you tube, yours are far the best Ive watched.
hi thanks for all the information you give us
i have a question between extreme q vaporizer and epic vape What would you choose?
regards for mexico
Elbow packing is most definatly the way to go, i have owned mine a little over a year now and your tips are spot on 392 farenheight is the ideal temp but dont theiw out those scrapings they make good potent edibles!
Really……mmmmmmm…….I’ve been throwing mine out thinking there is no substance left in the bud after the vaping……
Really bro?? seems kinda hardcore how strong are your baked goods ?
I make cannabutter with my already Vaped bud plus greens and have all happy consumers. Potent
I have the V-tech tower w no remote. My question is how do I turn on the fan to fill the bag ? My instruction booklet doesn’t tell me how & where the fan is . Help =0/ thanks
Hey Fran, you’ve probably already been told by now, but this model doesn’t have a remote control nor a fan unit. For those features, you needed to get the Extreme Q. I guess it’s a case of you get what you pay for. Sorry about that …
I have the V-tower Heat vape & I can’t fined or fugue out how to do the fan air flow to fill the bags . Help please!?
Can you recommend any mods to improve the herb loading “issues” you identified?
Buy a Volcano.
Do the herb baskets from the Cloud EVO fit in the Arizer Extreme Q?
It seems that may be a better solution than packing the herb in the elbow piece.
That may be a cool upgrade for Arizer fans.
isopropyl I is toxic
Hi Buzz, I am a child of the 70’s and after over 40 years I am now exploring Vape. I have gone over all of your video’s and they are by far the best on the internet! I must say I have learned so much!
I am thinking about getting the EQ desk top. It seems to be the best value for someone who is a novice and needing an introduction to Vape. I need to ask, can I add a water piece to this? I want to experiment with different delivery ways: bags, whip and water and at some point will most likely invest and venture into the Tier 1 desk top units. I have had trouble locating online a variety of water pieces that will attach to any vape units. I think you mentioned in one review that they are universal size. Any information that you can provide will be appreciated. Thank you! 70’sLady.
oopss…. I called you Buzz….I MEAN BUD!
Yep. It should come with a second elbow joint that can be used on the other end of the whip to fit an 18mm female joint water pipe. I think you’ll enjoy vaping.
Also,FYI don’t pull to hard on the joint to get it out of the whip – mine broke and sliced my finger to the bone. You can hear the elbow by using the fan and whatever heat you vape at and then it pulls out easily.
The eq is the first vape I actually liked. Had a pax before and hated it. Now have Enano and cloud ego and love them both. Have a firefly 2 as well that is ok. A dr Dabber aura and a numerous source orbs connected to a mini istick for wax ( way better than the original battery).
Thanks bud for writing these up. They’ve been one of my main guides for purchase decisions!
Just grabbed an extreme q based mostly on yours and a few other recommendations. Your review was invaluable! Thanks a lot man. Can’t wait to grab it in the mail. Any cool attachments you could tecommend? Or even a better vape for same cost? I have it shipped taxes in @ $205 (CAD)
Hi! Thanks for all the great info. I really appreciate your site. By chance have you had the opportunity to compare the 2015 model? Are any of the improvements significant enough to alter your opinion in any way? Thanks much!
I like to start at 210°f. Next bag depends on amount of visible vape for temp increase or not. Usually 4th or greater bags at 230°.
I’d like to say, this is my 3rd vape. I got so badly burned on both the first 2 that I am so glad I persevered. This works, just like it claimed. My only complaint was the potpourri cup was broke when it arrived.
Hi again Bud,
Oh, I forgot to mention that the likely reason that putting herbs in the elbow screen works better is because the straight section with the bottom screen just has a small hole for air passage in it. When the herbs are put in the elbow screen the hot air has room to spread out and heat the whole batch at once rather than having a narrow hot air flow through the small hole and blasting only a small diameter round it. Though I have seen that some of the material gets blown up into the elbow screen during fan use. But I see this is a very small issue.
Cheers,
DRS
Hi Bud,
I got a new Extreme-Q for Christmas and thought I would give my impressions here. I had been using the Arizer Solo for quite awhile, but it is slow to heat up with limited space for herbs. My wife and I have used the bag and the direct draw method. She loves the bag. The fact you have to put your finger over the end is no big deal. If you want to wait a bit before using the bag, just plug it back into the elbow glass. I have found that you can fill up the bag and wait until you are ready. I have left the bag plugged in for an hour before using it. The bag won’t leak if left plugged into the unit. I have also done direct draws just on the tip of the elbow glass when the bag is removed. It doesn’t get too hot. I just pick up the whole unit and get a draw straight off the elbow glass. It seems the best temperature setting is the 210C one for me. Given the flexibility of use I would recommend this vape over the Volcano and others because of the low price. It works great and we love it.
Happy New Year,
DRS
I’m looking for a good vape. Does this compare to the volcano? Because if it does then I might as well get this and pay way less .
Hi. I’m trying to decide between Da Buddha and Extreme Q for my first vape. Which do you think gives a stronger hit?
I got mine a couple weeks ago and I was dumbfounded to find out that they don’t accept returns if you used it. This thing isn’t worth buying, I couldn’t get it to work for more than like 2 hits on several occasions, no matter how much I stirred it around or no matter how much weed I put in it, no matter what temp I set it at.
NOT happy!
Anyone have experience with mod kits on ebay listed by ddave_mod for EQ? Is there really that much improvement over stock?
So I recently purchased the Extreme-Q as my to go choice DESKTOP vaporizor and OMG, I couldn’t be happier. True, this is the ONLY desktop I have ever owned but GOLLY JEE WILIKERS does it do the job right. Vapes smoothly, I put it at arizer setting 230°C and it gives me quality vaping at that range. I tried it on higher degrees but all it does it heats it quicker. And if you’re not a fast puller, or like to take your time enjoying your session, it will run out fast and your herbs will be wasted. Although it’s not the COOLEST thing to do, I usually turn it completely off as so far, when I turn the heat down to low, it takes too long to cool down and herb is constantly being heated and flowing through. Of course, this is if you use the whip. This is completely avoidable if you use the balloon but I only like to use that when I’m with a group. You get the best vape quality when you use no fan, but you must pull slow for a LONG period of time to get a good amount in one pull. I have tried fan setting 2 & 3 but it is EXTREMELY fast and you have really get used to the speed in order to catch all the vape or else your coughing.
If you want a little faster vape, your best bet (at least to start off with) is fan speed 1. Good speed and you aren’t as likely to lose excess vapor. What I find SLIGHTLY irksome is as bud said is holding the damn whip/balloon, but once your vaping, and your herbs are doing it’s job, then your not going to care and thinking about it, it will be better than implementing a stoppeer on your system.
With the balloon, I haven’t tried it yet, but from what I’ve read online (I won’t give links to respect bud’s website), turkey bags work a WHOLE lot better, they last longer and are generally cheaper. They’re cheaper usually because most if not all sites like hiking because you’re using your bag for a specialized purpose. So I’d recommend getting a turkey bag instead of reuppingg on exreme-q bags. Or if you know how to tinker, you can fanagle a volcano bag onto your system as well.
When I vape, I don’t go for tasty flavor, but I do taste some flavor when I vape. I look more for clean vaping even if I taste nothing. ANd I find tasting NOTHING is FAR better than tasting soot or ash. And this vapor is damn clean. And it is definetely comparable to the volcano, somewhat underneath it, but a damn good alternative. I have tried the volcano so I think I can make a fair assumption on that matter. And since the Volcano is the best in the biz, I’d say it’s personally second best maybe even trumping the Herbalizer (haven’t tried that one to make a solid opinion). Also it depends on the quality of your herb. If you get crap quality herb, then you shall get…ok quality vaping. Also, I’d try to fine grind your herb for even better experiences. Cleaning is a bitch in of itself but it’s an necessary evil (with the bowl and the screen) and they initially don’t know how to put on a fucking screen. Had to readjust it for it to be flat. Lastly, anyone who bitches about the rubber part being really hot probably has glass fingers because the rubber doesn’t get that hot. THE GLASS does.
Hi, great tips about the vaporizer. I am having trouble getting my herb to vape consistently. It seems that every other time i use it it’s just a waste of time and herb as i get absolutely nothing from it and when the bag fills i can see right throughout it. Does this mean the herb is low grade or is something wrong with the vaporizer?
herb is low grade and you didn’t grind it well enough
I don’t know if I am allowed to post a website but I have a serious question. Is aroma – tek legitimate? I won’t post prices or anything and I do not work for them. My question is do they sell fakes or factory 2nds? I apologize if I’m not supposed to put up a website but I would very much appreciate any info you have. Would you please email the answer if this is not allowed on the forum? Thanks for the website you are the best. You have saved me from wasting a lot of money.
@matt I have checked out reviews to Aroma-tek and I also asked Arizer for a list of their OFFICIAL retailers…aroma-tek isn’t official and they are a hit and miss. Many people complain they take WEEKS to deliver, don’t answer e-mails, and refuse to help you if you have difficulties with your product. Some have said that they are difficult with refunds especially if they run out of a product. THey will either not tell you it sold out, or if they do they will try to swap it with a lower priced model and not refund the remaining cash. If you find out by asking them, they will try to avoid refunding your money if you don’t stay on their ass about it or get legal action taken. They are part of a vaporizer website conglomerate all based out of Atlanta, GA. I would stick with the official retailers or straight from the company website.
Hey! I’m thinking of buying my first vape. I want a quality piece but I’m not ready to drop a fortune on my first model. Are you familiar at all with the V-Tower? It appears to be the “little brother” to the Q, with only the whip. I typically smoke with 1-2 people at most, so I don’t really see the bag function being particularly useful to me so I don’t waste anything. In many of your reviews of multiple vapes by the same company, it seems common place to use the same quality base parts, do you know if it’s basically the same with fewer features? Thanks! Your site has been very helpful and informative!
Hey,thanks for the review. I love the V-Tower, but I find that the screen does not stay in the cyclone bowl, even though the instructions say it will eventually settle. Ours flys around when you inhale through the whip and often means herbs spill down to the heater core. Your thoughts would be much appreciated!!
Vape critic thanks for your reviews but you really dropped the ball on this by not pointing out the screen problem. I can’t believe no one else is commenting on this bad design flaw with the bowl screen, a simple redesign that included a ribbed lip on the inside of the bowl would allow the screen to pop into place and hold it’s position. With the current bowl design the vape is not usable, wish I saved my money and passed on this.
my work around for the screen problem was to take one of the elbow screens and carefully seat it into the cyclone bowl using the eraser end of a pencil to push it into place and then flatten out the original screen and put that on top of the elbow screen and it lays in place much better.
Excellent review. I purchased an airizer today and I am very satisfied
Awesome… I just got mine in the mail today. Thanks for making this video.
I recently purchased the extreme q and love it so far. One thing I want to accomplish is a way to power it on remotely (I want it warmed up by the time I get home) I was planning on using the belkin wemo to do this but need to figure out a way to power on the eq as soon as its plugged into a power source, or simply just keep it powered on all the time then I could use the wemo to turn it off remotely. Have you ever seen something like this?
Hey I haven’t sorry but maybe someone who has will come across this
I’ve owned an extreme q for over 4 years now. Overall a very good vape which has served me well despite it’s shortcomings. Here are some of the issues I have with it. The glass gets broken sometimes but easy to order new glass. The whip and elbow attachments need to be cleaned regularly. The dome screen in the elbows get clogged and need to be cleaned regularly. Some control panel buttons on the front don’t work any more and the remote probably needs a battery because it works intermittently now. I don’t really care that much because I usually leave it at a set temperature and keep the unit switched on 24 hours a day. I’ve been careless and rough with this vape and have managed not to break any glass or heating element on the inside. I put this in the car on a power inverter and worked good with a passenger tending the vape. The whip is the way to go with this vape. If you want balloons full of vapor, look to the volcano or herbalizer… balloons take too long for me, and I get a better [result] from the whip anyway.
I’ve purchased both arizer vaporizers the grey and the black one. I love both vaporizers however both devices have broken on me after only six months and arizer hasn’t been much help. The grey one gave me a err 2 message and the black one the fan has stopped working. great product when it works unfortunately that’s not very long. I should’ve bought the volcano
Ah damn I’m bummed to hear that man!!
Hola TVC,
I just have a few quick questions with regards to the Extreme-Q…
1. Can it only be plugged into the wall?
2. Can you use the herb after it has been vaporized afterwards for edibles like you can with the volcano?
3. Is it a good replacement for something like a [water piece]?
Thanks alot man, take care!
Matt
Hey what’s up
1 – yes, the power supply is external and connected to the cord you plug in
2 – yes if it’s not too dark (vape at 383° or below if you want to save it)
3 – it’s a pretty good replacement, I do like the Plenty better for that though
Stay up!
Is it possible to use wax and [pollen] with this vape ?
if you mix a little in with some dry herbs yes
Hi, I just bought the extreme q as my first vape and like it so far. I did notice that when doing a practice run without herb, the air coming out of it smelt a bit mechanical/burning, is this normal for vapes?
Hey with a vape like this one yes, usually you should do a dry run (empty) for 10-20 mins when you first get it to sort of break it in, which also gets rid of those smells. Just let it sit and every minute or two turn the fan on for like a minute at a time.
can you use shisha aka hookah tobacco in this
Hi!
Thanks for your review, it made me decide to go for the extreme as my “First Vaporizer”.
I tried various partables but mainly my mates Volcano for long and finally i had enough to spare to finally get my own.
I am now vaping away my first round of bags and not at all disappointed. Yes, some of the parts feel flimsier and generally less nimble to use, but overall a pleasant experience. I don’t even think it would be too hard to adapt easy valves on it either.
…and there i go with my next bag….
Hi man, love your videos, so helpful
Want to ask you if it’s possible to [use concentrates in] the EQ
And I had only the MFLB and the Pax, do you think that to start with a desktop vaporizer it will be good for me?
Thanks bro, have a nice day
Hi!
Just bought an EQ and I’m not fully mastering it. I’m getting way more clouds out of my PAX and right now my EQ is not getting the praise it should. I’m grinding with the MFLB finisher grinder, letting the product dry before vaping. I’m filling the chamber about half full with the fineley ground material or I’m elbow packing up to the screen’s edge. Sometimes I fill the regular chamber and draw hard enough that the botanicals elbow pack themselves because of the draw force. Compared to the clouds you exhale in your 20 vapes in 15mins video either my unit is broken or I’m doing something wrong. Before starting, the EQ runs at least 5-10 mins at 392. To get light/light-medium clouds I need to draw like a lot to a point that it’s almost unpleasant.
Should I use a regular grinder instead for my EQ?
Should I go hotter?
Can you tell me what I’m doing wrong?
Thanks in advance.
D
Sup man, I was wondering if you had tried the “new improved” model Extreme Q? Curious if it stacks up any better in your opinion. Thanks.
Hey Bud!
I’ve been looking at a few vapes at this point, particularly this model, the silver surfer, and the plenty. I really have to keep my budget under $500, more preferably under $400. My main wants are strong vapor, the less maintenance the better, and longevity/ durability. However, my main need is something that I can both run long sessions on as well as very short sessions. For example, my father suffers from progressive MS and needs me at random times to help him function during his day. So I might go 2 hours without needing to help him, but all of a sudden have to jump up and help. In short, I have very unpredictable days. Functioning is not an issue for me so that’s why I’d rather just have strong vapor all around. I wish I could share with him, but the consequences are too great for him and could devastate his medical aid. Sorry for that rant, but I had to explain the situation a little bit. I need something that can vape maybe one or two draws, but not run into any issues such as wasting material while I’m gone, etc. etc. It’s probably a dumb question, but I’ve really come down to these three since a volcano is out of my budget and would be for quite a long time due to how I have to distribute my money. Thanks, I hope this makes sense, and thank you for being such an awesome, well informed, experienced and respectable spokesperson for this community! -Ben
Hey I just bought the newest model of the extreme q a couple of days ago,and for some reason,the bags work a hell of a lot better than my whip does..actually in all honesty,that’s almost an understatement.what I don’t get tho is that I’ve used the whip on different temps and diff fan speeds.what’s weird is when I turn on the fan when using the whip..I can SEE vapor flowing out of it,but yet when I go to take a drag all I get is a bit if flavor,but I don’t see OR feel any vapor WHATSOEVER.got any ideas on why it would be doing this bro?
I don’t want to sound picky but I am a senior female who just started to puff a couple of years ago. I purchased a v tower around 11/2 years ago. Maybe I’m doing something wrong. I don’t understand this “elbow packing” idea. I get the principle but my experience is that the herb goes into the elbow on the first puff. After a few puffs I scrape it out of the filter in the elbow, back into the bowl and remix the herb with that little glass stick they put in the v tower pack (in all honesty I broke mine long ago so I use whatever is handy and fits and allows me to remix.
I feel like this vape could increase a few points if it had a more premium feeling balloon system like the volcanos. Even the easy valve system is like a $10-15 increase.
Yo Bud this is an awesome review. Lovin the video! Just ordered a replacement screen pack… The package came sooner than expected and they threw in another screen pack with a no charge sticker on the bag. I am seriously impressed. I got my vape second hand off a guy three years ago and although it has only seen light use, it still works great to this day. I find the sweet spot for me is 210C (410F).
Thanks for putting out quality info.
Hello sir,
I must say I am very impressed by your site, you seem to be very capable as both a reviewer and a vape connoisseur. I enjoy watching your reviews because they are unbiased and quite professional. 75% of all vape reviewers are taking hits as the review is taking place, and wind up baked by the end. But fuck man you keep it strictly professional and I’ve never seen you take a hit and screw around. Keep up the good work Bud, you got mad skill.
We have had our Q for three months now, and its MARVELOUS! now im interested in portable, perhaps wax/oil pen?, to replace a j on the road. like to have a Solo eventually, spendy item, but its not really the portable id prefer!
Not sure if here or sumwhere on the web we found out before our Q arrived, how to pack in the elbow bowl, rather than in the big bowl that sits on the heating element…that info was PRICELESS! we burn at 220, a preset, another awesum feature. Even if we both double down(burn two elbow bowls each), it is SO much less product, and i giggle like a school girl after! ONLY if i pull REALLY hard do i coff…otherwise, its enjoyable for those with allergies/asthma, etc…i TOTALLY think its the best vape on the market, and uses so much less, its paid for in no time! and Bud, thanks for a great site…awesum!!
Just recently purchased this vape and am anxiously awaiting delivery. I appreciate your thorough reviews, tips, tricks from the desktops to the portables, all the way through. They’re awesome! Helped me make what I think to be, a very wise decision in both departments.Thank you for the great work!
Question: Would it be possible in some semi easy fashion to use and/or at least fill up the volcano easy valve bags with the EQ in order to take advantage of the mouthpiece and overall better bag quality from Volcano?
Thanks!
Is there an add-on attachment for wax? I’ve got some wax for severe pain…..took your advice & ordered EQ……Atmos g pen wax adapter has broken (x3) times & I’ve only been vaping for 2 mo….
mix, soak mix or put on top2 melt(still a mix tho) the flat screen will not even dirty, also turn temp down when your good,then clear out with two more draws which will be good. save it for 4-5 more sessions. temp 437 to start and increase in5 degrees when vapor fades
Hey,
was wondering what i should get and Extreme q 4.00 or Da buddha ? i know Da buddha has better vapor quality, but im wondering how much of a difference that is. A
Hey it’s not a huge difference so get whichever one you like the look of better, performance is fairly similar.
Hey bud, I picked up an EQ last week. I’m still trying to figure out if I’m using it right. I’ve been getting great draws off the quality of herb I use tho but
1.don’t really know how to elbow pack or if doing it right. I’ve heard of people getting a lot of draws of small amounts, but for me I seem to be gettin a max of just 4 draws, no matter how much I elbow pack.
2. I’m vaping at 375-392F.didn’t really like packing in cyclone bowl, dont know if its any better.
3. is it better to elbow pack small bowls than full elbow packed. And at what temp.
4. how do you recommend i use the bags. Do I full elbow pack or full cyclone bowl pack, and at what temp.
any tips for the EQ would be awesome
Hey man, awesome awesome videos. I have been watching them for years I guess at this point. Man time moves quickly… anyway back to the point. I have owned both units, I bought an EQ first and loved it. I watched your videos on how to get the best use out of it and everything was working nicely. I had an itch for the Volcano though, so eventually I found a used one on ebay and sold my EQ to a friend. I can’t even describe to you how much better the Volcano is. Watching the bag fill for the first time, after having used the bags with the EQ was unreal. The vapor is so dense and fills in no time at all. It’s crazy fast. The taste produced is at least twice as flavorful in my honest opinion. I had the solid valve setup and cleaning was a breeze. I never had an opportunity to use the easy valve kit so I can’t speak on it personally. If you can afford a Volcano, there is no comparison in all honesty. Even considering you are losing the whip functionality, you will not miss it, I promise. It is night and day and worth every penny.
Hey thanks for posting and being a long time viewer, and I agree about the Volcano!!
Hey man! Im not HUGE on these comments But considering you video inspired me to purchase this unit I decided id give it a go. I just want to say, For a first time vaper and my first vaporizer.. I love this thing… Yes I do now only use the whip. Im currently vaping a little hot around 415. I have 2 Questions. Is that too high do you think? And Im looking to buy a Portable vape. YOu think the “PAX” by ploom is a great choice? iTs really the one ive got my Eye on. Well sorry last question.* I know its 3 lol* WHat portable one if any would you recommend. Money isn’t really the issue however id like to stay away from the 350-400 dollar range
Hey man thanks for posting, very glad you’re diggin the vape!
Yes I do think that temperature is a little high, with this vape I’ve found the 383°F and 392°F settings to produce the best vapor, but it’s also personal preference so if you don’t mind it that high don’t worry about it, but try it out because you’ll probably find the vapor to be smoother at the lower temp and just as potent.
And yes to question #2 also, I think the Pax is great and it’s still my go-to portable in most circumstances, anytime I leave my house and want to bring a vape with me it’s the Pax.
But I also like the Firefly, which is technically portable, but it’s heavier and a bit more involved to use so I mainly keep it at home and consider it a very good ‘cordless’ vape.
hey man, love your site!
I just recently picked up the EQ and i’m having a bit of trouble with it. I just can”t seem to get any vapor at all. I’ve watched your videos explaining optimal temps, how to pack bowls, finely grinding the herb and drying it out, ect. but nothing seems to work. Right now i’m setting it all the way to 260c and allowing it to heat up with the fan on for about 20 mins before I load ‘er up and still not getting anything. I can def. taste it but i’m not actually getting [effects]. Just wondering if there’s something else i could be missing or if maybe the heating element is faulty, though the glass does seem to get very hot.
Hey thanks man, try these exact steps and let me know how you make out:
1) turn vape on and set it to 200°C (392°F), leave the fan off for now and let it warm up for at least 3 minutes
2) make sure your herbs are dry and finely ground them up, then pack them fairly tight inside the top elbow screen, don’t put anything in the main cyclone bowl for now
3) once it’s warmed up place the packed elbow inside the main piece, and make sure all your material stays inside the screen and doesn’t fall out
4) using the bag for this example attach it to the end of the elbow whip, then turn the fan on to the medium setting (fan speed 2)
5) after roughly 90 seconds you should have an almost full bag with lots of visible vapor inside, you probably won’t be able to see though it
6) shut off the fan and detach the bag from the whip, then enjoy
The procedure is basically the same when using with the whip but just make sure that you take long, slow draws for maximum vapor when using in whip-mode (you can turn the fan on to assist with whip draws also, at least 5-10 seconds each draw)
Let me know!
Thanks for the info. Checked out your site before buying one. Bought the EQ… use the bag…. doesn’t take long. was having a problem with temp settings… my fault not device. Burning the herb. will try 200. Good tip with the alcohol…. have to try that. Was placing glass in hot water… just before a boil and it cleaned them really well… but don’t want the kids to see or smell.
What’s the recommendation for a portable one? Doesn’t have to be “small” just would like to have one that; come home from work, no need to set up, quick draw before shower and then can join the family in the living room…. already “set”… Pax or firefly???
Thanks again.
Hey what’s up, the Firefly is the vape to get for the exact situation you describe, it’s perfect for that.
Im new to the vape world and would like if someone could give me a comparison ov this to the vapir one 5.0,
hey i was wondering if you or anyone else has any experience with the vapir one 5.0, would appreciate opinions before purchasing one.
Hey man love the reviews.
Just wanted to say that I’m getting my first vape tomorrow and I decided to start out with the extreme q and move my way up to either the plenty or the volcano (who knows maybe both) I like the fact that it does do both for a very nice price. I actually did buy an easyvape clone from local shop but I dont count that as my first because it was a bad experience and was an uneducated buy.
im not sure you used the same vap as me…. my ex q rocks i wouldnt trade it for a volcano….. is the volcano a lil better for bags, yes worth the cost for just the plunger on bag hell no. volcano is now made with crappy Chinese parts…ex q is all Canadian easy to get your parts n warranty. is ex q a great starter vap, yes, its also great for anyone who doesnt want to spend hundreds more for a 5 cent piece of plastic on ur bag, as thats the only plus to a volcano.
Chinese parts eh?
Hey mate I bin lookin into vapes lately.. n I’ve bin watch in ur videos n they are pretty usefull and straight forward which is sweet.. I tried the flight box n it WS a bad choice for me because I’m a heavy daily user which is fun.. but getting on.. I like the idea of the whip vapes but [also like] the idea of bags.. when i got money I’m not a tight arse so it won’t be like I won’t buy 1 in future.. but for now I just wanna no between the extreme q and vapor rise which 1 is quieter, which 1 fills a bag quicker. And which 1 saves more herb.. I mean do u have to fill the vapir up a lot to get good results or does it work as good with a pinch… cheers mate I’m leaning more towards extreme q coz u can use with out fan.. I no u are against the DUo modes but I gotta figure that out what my preference is
Cheers mate
Hey man I personally prefer the EQ a little more, mainly because you can turn the fan off and also because it’s a little less cumbersome.
I have been considering purchasing either the extreme q or the vapir rise as an alternative to the volcano (not wanting to dish out that much money for a vaporizer). The only reason I am considering the vapir rise is that it has a valve lock for the bag so you don’t lose vape in between hits. Is there anyway to outfit the extreme q bags to have this feature? Maybe buy the plug thingy from volcano or the clip from vapir rise for the bags. I know i”ll forget to keep my finger on the balloon mouthpiece and I wake up in the middle of the night so it would be more convenient to have a bag ready by my bed so i can go straight back to sleep. Are there any other balloon vapes you would recommend?
cheers!
Hey thanks for posting.
I personally prefer the EQ over the Rise – there’s actually a part you could buy that I heard works for the bag I think it’s called a Camelback mouthpiece (not sure exact model) and it’s made for like a water bottle type thing. Supposedly you could attach it to the end of the mouthpiece from the balloon and it’ll act as a valve, I just haven’t tried it personally.
Unfortunately there aren’t many balloon-style vapes I like and recommend, the herbalAire is decent but mainly in whip mode the bag system is pretty cumbersome.
Purely as a balloon style vaporizer, in terms of vapor quality how does the Extreme-Q compare to the VapirRize?
Am I correct that you leave your herbs on the heat between balloons with this one? I feel this is a draw back (loss of vapor, flavor, etc…). I have used the solid valve system for the volcano but I can’t afford one for home. I like that the herbs are only in contact with heat while filling the bag, not cooking before and between bags.
Given that I am only going to be using it as a balloon system what would you recommend, the Q or the VapirRise. I can get the Extreme-Q for $50 less then the VapirRize but the price difference between the two really wont be a factor in my choice.
Unfortunately I’m not a huge fan of the VapirRise and I rate the EQ a bit higher.
Vapor quality is better and it’s fewer parts & easier to use, although both models are a tad cumbersome.
You can remove your material from the heat between bag fillings with both also, but I’d probably go with the EQ if I had to choose.
Hi Bud,
Great site, that I only discovered after ordering this Vape, I almost wish I’d found it before, that’ll teach me to do my research.
Anyway, long post regarding the product below:
I’ve just purchased the newer all black version of this unit after my second Vapir Oxygen mini broke after about getting about 8 months use on each one, so it was a rapid necessity buy that I didn’t really research enough.
In terms of Vaping, in the past I’ve also had 3 iolites (all were eventually faulty,) and while I also have a magic flight box, I wanted something reliable for home use as well. But for its reliability, I’d recommend the Vapir Oxygen highly for home use, especially for the price, so spending more than double on this has left me with some mixed feelings.
Firstly, the base unit looks great, but the whip and glass attachment is not the most elegant solution, looking decidedly dodgy by comparison, though in fairness, when these parts are removed the unit is sleek and instantly plausible as an aromatherapy device if discretion is key.
I initially found the inhalation sensation to be very airy and weak compared to the iolite, MBFB or Vapir mini and at first thought I had a dud. But after blowing out a massive amount of vape from a weak tasting hit, I have to compliment the coolness and quality of the vape produced. In terms of producing quality vape, this unit does the job very well, particularly using Bud’s elbow packing suggestion for the herb. The vape quality it produces exceeds all the other vapes I’ve owned so in that regard I can’t fault it, but if you are used to a hotter vape it can be off putting at first.
I don’t plan to use the bag which is why I’ve never wanted a Volcano, so can’t comment on that function, which kind of proves I didn’t research this buy enough, as in essence I bought this for a toking style unit with what I hope will be great reliability. So despite it not being regarded as a great whip unit, If it lasts at least 3 years of heavy use I’ll be satisfied. The fan is also a nice addition even if you just using with whip style.
One decent bonus is that unlike all other vapes I’ve used this does seem to have some fairly legit use as an essential oils/aromatherapy device, which I may even look into somewhere down the line.
Overall, I’m almost regretting not getting the Vapir No2, as it’s very similar in use to the Vapir Oxygen, with both being a more discrete and stylish unit overall.
But I had those 2 Vapir minis go faulty after months with problems relating to the digital display, a problem I could see potentially happening with the Vapir 2 somewhere down the line, so felt I had to try elsewhere.
On reflection I should have got the Volcano handheld, despite it looking ridiculous, I think I prefer the handheld style to the chemistry set style whip units.
Though in truth my personal experience with handheld vapes is that they have reliability issues, so if this Arizer stays the course it’ll still be well worth it overall.
Hey thanks for posting and sharing your thoughts & experiences with this vape, hope you’re enjoying it!
What’s up man. I was thinking about getting the extreme q but have heard others saying the glass pieces and unit itself breaks easily. I’d like to get it but don’t want to waste $$ if it will break in a matter of weeks. Based on your experience using it, is that fragile? About how long do you think it might last if you’re careful enough and use it properly?
Sup Jay, it’s definitely a little on the fragile side but the glass parts are actually pretty durable. It’s still possible to break things if you’re clumsy like me but I don’t consider this one so fragile that you really need to worry much. It will probably outlast your desire to use it, meaning it’ll last for a while if you’re gentle with it but you’ll probably decide to move on to better vapes before it has a chance to break.
Also have you tried the water pipe adapter for this yet? If so how was it?
Haven’t tried any adapters made for this vape but I think most people like it. I’m personally not a huge fan of vaping through water so my opinion on it differs from many.
What’s up you say you use the elbow bowl with the fan on. Do you get the same effect with it in the normal chamber and the fan on or no?
I’ve always found the vapor to be lighter when I pack in the normal chamber, with fan on or off, and not as thoroughly vaporized, so the only way I ever really use it is elbow packed.
i have a really important question. how much should i be filling the bowl up? i read somewhere to fill it up half way and thats what i have been doing. how many bags should i get if im filling it up half way with [material] thats stupid crystally and busted in a magic bullet? i have been doing two bags, the first one on fan setting 1 after the cylone bowl is hot (a few minutes after she reaches 200c) then i give it a stir and brew my second with various speeds. i just dont want to be smoking nasty old tree, i still havent tried the whip because im more of a glass smoker and the bag really gives me the feeling im hitting my hoss.
Hey Matt,
If you’re packing in the main cyclone bowl piece I would say half full is pretty accurate. I’d estimate being able to get about 3-5 balloon-fulls from that.
I’m not sure if you’ve seen my video about elbow packing but that’s actually how I prefer to use this vape. Instead of putting your stuff in the cyclone bowl pack it inside the top elbow screen.
You won’t fit as much in there but you’ll probably notice that the vapor is thicker this way and it vapes the herbs more thoroughly.
thanks dude, can you elbow pack with the whip?
No prob man, yes absolutely that’s my favorite way to use it, and I turn the fan on low during each draw to get more vapor
I really like the Q and using the balloon method. I suppose I will be able to afford the Volcano one day as an upgrade but for now this is very awesome and I use 1/3 of the meds I used burning them. I must agree the effect is the same but a little better IMO. I appreciate your reviews dude ! UROCK!! Keep Vaping!!!
Hey cool glad to hear you’re diggin it, vape it up!
Hi Bud, your videos are soooo helpful, thank you so much for them. Im thinking of getting the Extreme but I’m new to vaping, about how many balloons can you do off an elbow pack? In the video you show the pictures you did 5 hits on the whip I believe, so just curious does 1 hit on a whip = 1 balloon?
Hey John,
From a full elbow packing you can expect 2 good dense balloon-fulls, and maybe a third filling that’s a bit lighter.
i also tried the elbow pack.. i put like .3 and it just felt sorta gross cause i did it on 220c, i brewed one slow bag and wouldn’nt even think of doing a second.. it was sorta gross? but maybe thats what i should be doing if im only being to be brewing one or two bags (one for sure with the elbow pack)
Hmm yea man maybe try a lower temp in the range of 195°c to 200°c, it shouldn’t be gross.
I usually get 2 good bags when elbow packing.
Hey Bud! Thanks for all your informative posts they have really helped me make a decision on which vape is best for me. Question about the extreme q: is the fan very loud?
Hey no doubt!
It’s not very loud but it is kinda high-pitched, so thankfully it doesn’t need to stay on for long otherwise it could get annoying.
Great video and review on your part. Based on your review I decided to purchase the Extreme-Q and am very satisfied with my decision. I really like how easy it is to set up and use. I find the remote very handy as well. I have reduced my insomnia “tobacco” usage by 2/3 by using this vaporizer vs. smoking. The unit will pay for itself in just two months for me.
I also received excellent customer service from the manufacturer. When I opened the box one of the glass pieces was broken. I contacted them and they sent a replacement glass piece the next day.
I recommend the Arizer Extreme-Q to anyone considering purchasing a vaporizer.
I had my Extreme Q for 360 days. Loved it, vaping changed my life. On the 361 day, it turned itself off 4 times, then it was dead. Nothing. No power to the unit at all. It’s now a door stop unless I can find someone in the USA to repair it. I will not send it to Canada. Do you know anywhere in the US where I can get it repaired?
I’m looking at a couple of options for a table-top vape and was hoping you could answer a few of my questions. The DBV, SSV, and the Extreme-Q are the vapes I’m looking at, and wanted your thoughts on how they compare.
First, is there any noticeable difference between the DBV and SSV past the slant of the SSV? If that’s the only difference, it’d be an easy fix to attach something to the base for a permanent slant.
Moving onto the Extreme Q, you had said that elbow hits greatly improve the EQ, but does it bring it up to the same level as the DBV/SSV? Speaking of elbow hits, have you ever filled the elbow joint and the cyclone bowl? This won’t weigh in on my decision, but I’ve been curious about it.
That’s all I have on my mind right now, and thanks for all of the great reviews and videos you put out.
Happy vaping!
Yes aside from it being angled the SSV also holds your material a little farther away from the heating element, which helps prevent overheating.
When using my DBV the material overheated a couple of times and gave me a funky taste, because I left the wand attached to the heater cover too long without drawing.
DBV does the job SSV does it a little better, without needing modification.
Packing in the elbow is really the only way I like using the EQ, and it works well. Overall I rate the SSV a tiny bit higher will all aspects of ownership considered, but if you elbow pack vapor production is roughly equal.
I have not tried packing both the elbow and the cyclone bowl at the same time.
Stay up!
speaking of the EQ and elbow pack, do you have a preferred temp and fan speed for elbow packs?
I usually vape it at 392°F and I turn the fan on low speed
units are ok but i’ve had several of them fail within warranty so you get what you pay for. cheap vaporizer, cheap product. my most recent one that failed i decided to try to get it replaced under warranty instead of going ahead and purchasing another like i’ve done in the past and the manufacturer would not replace it unless i paid them money!!! their warranty is a lie, don’t believe it. arizer warranty is false reassurance for buying a sub-par vaporizer.
Thanks for sharing your experience with this vape, I’m very sorry to hear it wasn’t a good one.
A friend gave me the EQ. I know this is going to sound stupid. What do you do with the herb between vaping. I use it at noon and then use again later that afternoon. Do you leave it in the EQ or put in something else til ready to vape again and then put back on the heat? Again I know this is prbably a stupid question but i am old school and this is new school for me. Thanks
Doesn’t sound stupid! You can do anything you like with it, I usually just leave it in the chamber, but you do have to make sure it’s no longer being heated to avoid wasting any.
So for example you could set the glass chamber piece (with your material in it) to the side for a few minutes while the unit cools down, and then you can put it right back on and get it ready for your next session, just don’t turn on the heat again until you’re ready to vape.
If I just confused you let me know :)
What’s Up Bud,
I’m completely new to vaping, and I have never tried it. I am torn between the HotBox and The ExtremeQ. I noticed you gave the HotBox 80/100 and the Extreme Q an 85/100. That’s not much a difference, especially considering the HotBox is $100 cheaper, and a lot more user friendly for a newb. What would you recommend?
Hey what’s up,
You know what for newbies I think the Hot Box might actually be the better choice, it’s definitely less complicated and produces similar results.
can you compare the EQ to the SSV? for whip hits?
I personally only liked using the whip with the EQ in conjunction with the fan, meaning each time I took a draw I would turn the fan on low to help it produce more vapor.
Overall, in straight whip-mode, I consider the SSV a better vape. I think it works better at evenly heating all your material, it tastes a little better, and it’s made from more durable materials.
What is the difference between the 4.0 version and the new version, 5.0 ??
Hey I haven’t tried one of the newer models yet but supposedly the fan is a little quieter and some of the internal components were upgraded. I’m not sure how much of a difference it makes in regards to performance, but I’d imagine it’s minor.
hey guys! wow, just found this site, it is incredible. All kinds of good stuff.
Anyway, I JUST got my new Q in after I screwed my old one up after experimenting with the potpourri bowl without reading the manual. Anyway, I think the only thing I noticed for sure was that now you fine tune the temp even more- down to the degree. And also the exterior cone was black not silver. I like to think the fan is a little quieter and maybe more efficient, but that might be trying to justify buying the new one after not having my old one for very long.
Hey Matthew, thanks for posting!
as far as i know, the difference is not in the vaporizer itself, it’s in the accessories. you’ll get what they call a GLASS TUFF BOWL. the bowl is now covered with a material, that shall prevent it from breaking. there’s no update in the vaporizer and if you can get the 4.0 at a reduced price, the GLASS TUFF BOWL is $14.99.
I just bought an Extreme Q vaporizer and on the bottom of the extreme Q base (BLACK) IS A COPYRIGHT 2007. N 220-00759. iT LOOKS BRAND NEW BUT I AM WONDERING IF I GOT AN OLDER MODEL. HOW CAN I TELL IF I GOT THE NEWER MODEL OR IF IT IS THE OLD ONE? HAVEN’T USED IT YET UNTIL I FIND OUT OUT IF I GOT THE RIGHT ONE. CAN YOU HELP ME? tHANKS
If the outer shell is almost black it should be the newer model.
I have the older model and it’s more of a silver color on the outside.
Hi man!
I can say that I’m an experienced herb smoker, more than 10 years with joints, [water-pipes], pipes but I’m totally new to vapes, so new that I don’t even tried it yet.. But I can wait to have my first time! :)
But as I live in Brazil and the taxes to import this vape are very high, it would require a lot of money to get one. So I’m doing a lot of research to see if its really a good buy! Please tell me, does it really gets you high? I read in some foruns that it gets you less ‘vegetable’ and you feel more active but does it gets you laughing, relaxed and hungry the way a good joint would do? thanks in advance!
Hey sup,
Generally I’ve found that once you get used to vaporizing the effects are extremely similar to most other methods.
At first it might feel a little different, but after a while it feels just like anything else.
hey man would you rate the Q higher if it had a better taste? because honestly I think it does well in every other aspect I have been using the Plenty lately because my friend wanted to get a good bead on the Q so we traded for a bit.
The coulds from the Plenty are about the same as the Q if you grind your herbs fine but i did notice that the Plent can vape anything! (damp clumpy herb)
they both bong about the same if you use direct draw with the Q instead of the whip but again plenty has an amazing taste and the Q needs to be cleaned a little more
overall Plenty wins I think but I do love the variety i get from the Q
I’d rate the EQ higher if it was overall a better vape.
The versatility of it is cool, but in my opinion it’s a mediocre version of a whip vape and a bag vape, it’s not really that great in either area.
I think it gets dirty too fast, doesn’t feel as high quality as the better models, and only works really well when you elbow-pack (small amounts at a time).
The fact that it’s cheap was also a factor, cus if it was any more expensive the rating would be lower.
I agree its a cheaper whip vape but you can get way thicker bags from the Q than the volcano and its not nearly as loud (Not a Volcano fan at all) and surprisingly the Extreme Q does a better job at bonging than any other vape ive used and the bong is imo is the best way to vape anyway
I agree that the Q is a cheap vape but as with the MFLB thats why its great you can pick it up for under $200 and does the job of multiple more expensive vapes and that’s why I think its over all the best product on the market (no not the best vape but product) bags get boring fast so can the whip and even the bong so its nice to be able to do it all with 1 product would you buy 3 microwaves or the one with multiple options?
just saying you have all the vapes so for you its going to seem like less of an issue but not everyone wants to buy a Volcano, Plenty, and Cloud for over $1500 just to get a slightly better quality for the same functions as a $200 product
Sorry man I don’t agree, I don’t think the EQ does anything better than a vape like the Volcano, nor do I think it is anywhere near the best product on the market.
The fact that it can do both whip & bag mode is nice, though neither mode is very impressive, but I think the rating I gave it is actually pretty generous.
I Agree With kyle you seem so naive shelling out $700 for a herbalizer which temp range 290 F to 445 F When Extreme Q 122 F to 500 F better vapor volume and quality of vapor per whip hit with extreme q 4.0 if you knew how to hit the q correctly , elbow pack fan 3 and apparently skill? the balloons for the extreme q do suck for the most part though i will give you that , i have hit the extreme q , herbalizer , volcano, ssv , herbalaire , vapor brothers and various others so i’m not new to the vape game by the way your video review is of the vtower not extreme q which has 27 upgrades which you said in a comment would probably make a minor difference so again naive
under-shirt-method
put the whip under your shirt and put the collar above your nose.
the vape will accumulate under your shirt and you will not waste anything … until the vape is so dense you can not breathe anymore ;)
If it works for you then by all means, keep it up! But I just wanted to touch on the fact that you mentioned this method “will not waste anything”.. Any fabric your shirt is made out of will be very porous, and will most certainly be letting some amount of the vapor seep through the fabric. That said, if you are only using it as a second line of defense so-to-speak, then it’s definitely better than nothing.
Breaking the glass ring on the cyclone bowl works! my bf read the comment and having 3 bowls atm tried it, we ended up doing it to all of them it worked so well!
Want to start with a thanks to the host and author!
CheerZ! man – you saved me alot of time figuring out the sweet spot(s) with this vape.
Anyway, I also altered one of the bowls today as is described above, and want to share what worked well for doing this.
Instead of a drill bit, I used a 1/2 inch, bastard, rat-tailed file.
Just drag it through the bowl with a little pressure, rotating the bowl slowly around as you slowly chip away the ridged area.
As mentioned, the scren still fits and stays in place, fine and I will add that the main part of the bowl is so much thicker (substantial) that there is almost no danger of damaging it while performing this alteration.
hello,
hey ive used a few vapes and i recently decided to get the Q becuase it only 200 hbucks and feels like the best bang sort of speak but i actually found this little trick by accident i wont bore you with the long story but…
in short that little glass hole in the cyclone bowl if you shave it down to just enough to hold the screen in it seems to dramatically increase the efficiency of they cyclone bowl it vapes faster more evenly no stirring is needed and i can get stronger draws… but im a low temp kinda guy so that part was just icing for me
ohh and it seems to have little to no effect on the elbow pack technique so ya i thought you might wana give it a try but you have to be careful the screen obv still needs to stay sturdy
sorry for the long unorganized thoughts i just had a sesh lol
Sup man,
Thanks for the tip, I always wondered why they didn’t make that hole larger to begin with, it seems very restrictive.
What method did you use to shave down the glass?
actually wasn’t so much a method as me breaking it and then just smoothing the glass down with a knife sharpener like it was actualy an accident maybe see if you can contact someone who speaks glass work : / i really wish i had a better answer if you figure something out plz post
hey man i broke a bowl for my Q … but that did give me a chance to experiment with that little glass ring..
I have to tell you i was VERY surprised i broke all the glass off the sides there is now only a very tiny amount of glass that i cant even cut my finger on around the inside of the bowl and the screen still holds very firmly in place!
in short that ring is not only pointless but is one of the main inefficiencys of the unit
Nice man!
What do you mean by this process can you explain what Kyle is saying please thanks
I have been an Arizer user for over 5 years, using the traditional model. This spring I decided to upgrade to the Extreme Q, that was a big mistake. The temperature variability is such that this new model wastes herb and can actually overheat the whip when you raise the temperature high enough to compensate for the temperature at the low end of the variability range.
I have a chain of emails to their service tech that is literally over 25 emails long going right back to the spring. I even sent them a video showing the temperature suddenly drop from a false reading of 223c to the real temperature of 210c when the up or down arrow is pressed. If you already own this model, try it, you will likely experience the same thing to a greater or lesser extent. Their service representative has been less than helpful, to the point of being disingenuous. He refuses to accept that this is a problem. This serious problem makes the vaporizer far less usable and more wasteful than the older model which thankfully I still have.
@Charles:
This one was designed for use with dried botanicals only so I’d be very cautious if trying anything else in there, and I’d say it’s safer to avoid it.
Hey thanks for the videos they really helped me make my decision to get an extreme q. I’ve had mine for about 5 days now and have been using heavily. Im starting to notice the bag is taking a lot longer to fillip. I’ve already ran the cyclone bowl and elbow through alcohol and still nothing. Could it be the screen where the bowl sits on? If so how should I clean that?
Hey Charles,
Glad you found the vids helpful!
I’ve never actually cleaned that specific screen myself, as far as I know you shouldn’t need to…
Do me a favor, next time you fill a balloon set the fan on high (speed 3) and time how long it takes. When I did my testing it took about 90 seconds to fill the bag like this, let me know how long yours takes.
I actually went ahead and took off the screen from the neck where the cyclone bowl sits on. Don’t ever take it off. It took me a good 10 minutes to put it back on its a nightmare. I actually ran more alcohol and soaked the screens separately and scraping off residue and it seems to work great so thanks for the quick response. It seems to be back to normal now. I didn’t realize how much i overuse the device compared to most owners haha.
Haha snap!
Cool I’m glad you got it straightened out
Hey can we vape wax? Just picked up a 40$ gram and was curious
Hey what’s up?
Great review. I have a 2010 unit myself and can agree with most of your review … I have this question for you though: with the 2012 model out, I’ve been wondering if I should upgrade. My greatest desire to upgrade concerns vapor quality … So I ask, does the new vape produce superior vapor compared to the 2010 version, at the same temperature?
Thanks
Sup Mack,
I would say that the difference in vapor quality between the two versions is negligible. If you’re looking to upgrade and want superior vapor strength and quality I would recommend you look at a vape like the Plenty, which is one of my personal favorites for just this reason.
I think the Extreme-Q is decent, especially as a first vape, but in your situation where you’ve already owned one for some time I think you’ll be more impressed with a unit made by a better brand.
If you have any other questions about this vape or other ones let me know!
Stay up!
-Bud
How do you know what year your model is? I am trying to replace the heater cover but dont know if it’s the 2010-present version or the one before that. I bought it in 2012 however from a store in NYC if that helps. It looks like the one in your video.
I’m not sure how you figure out what year model it is but I know of two main EQ variations since I started doing this, and the original model is the one I show in the video which I also bought in 2012 like you, so we probably have the same thing. The newer version that came out a year or two ago has a darker shell on the outside.
Main difference is in the controls. First version is in 5C increments, new version is 1C increments and better temp sensors (less drifting).
I’m looking at buying the Extreme Q from an online site, I am worried about the warranty though. Do you know if the warranty is valid if I buy it for less than the company site sells it for?
Hey Jonathan,
Good question.
Generally the way it works is all fully authorized dealers of vaporizers have to charge a certain price for each vape to maintain their authorized status (referred to as MAP). In addition, you normally need to have purchased your vape from an authorized reseller for your warranty to be valid.
Although you may find some models being offered below the regulated price the safest way to buy this kind of stuff online is through an authorized dealer (like the one I link to).
I would be wary of sellers who claim to be authorized but sell products below the minimum price set by the manufacturer. It may be possible that if something goes wrong with your unit they will help you out, but overall it’s just a little riskier.
The MAP for the Extreme-Q is currently $239, so if you do buy it for less just keep in mind you’re taking a little bit of a risk, so it’s just a matter of peace-of-mind.
Hope this helps
Stay up!
-Bud
Hey Bud, the vape i’d really like to get would be any by storz&bikel but as im on a tight budget im thinking of getting an Extreme-Q, i got a couple of questions though. I watched that video where you show the usb microscope’s pics and i noticed that the herbs vaped in the extreme-q looked black on the tip as if they had been burned. i know im asking too much with this question but do u know if thats a little combustion goin on? and if you are using the vape whip-style, does the whip get a bit dirty over time? and if so how should i clean it.
thanks for all the reviews bro!
Sup Raf,
There’s no combustion with the EQ, the magnified pics just make it a look a little like that. When you pack in the elbow the heat gets concentrated to a small area so it vapes the herbs a little more intensely.
And yes, the whip does get dirty and it builds up residue, to clean it you can try soapy warm water or some rubbing alcohol. You’ll have to get in there with somethin to scrub it if u want it to look really clean again.
Stay up!
Thanks for the quick reply man, can’t wait to get my hands on a good vape and vape my way to heaven, just kidding , but yeah can’t wait
Just add some salt to the rubbing alcohol and shake. The salt will provide all the scrubbing action you need.
Rice also works. I mix mine with methylated spirits.
Hey Bud. I’ve had my Extreme Q for about a month now and it’s just great. Even more so now after the tips you gave me on how to get the best use out of my whip. It helped me alot thanks. A new problem with the balloon is emerging. The inside walls of the balloon are becoming sticky, and they are sticking together, so as the bag fills, it now requires alot of preening and pulling apart the inner walls as it is filling to get it to fill fully. I imagine the stickiness will get worse as more vapor condenses on the inner walls. Is this a common problem? Is there a remedy for this? Anything you can do to help will be greatly appreciated. Thanks.
Sup Johnny,
Thanks for the email, and I’m really glad you found my tips helpful.
The problem you’re describing with the Extreme-Q balloons is very common, and I experience the same thing myself. I probably should have talked more about it in my video, but this issue is another example of how the EQ differs from a vape like the Volcano.
Unfortunately, I don’t think there’s much that can be done about it. There’s really no way to avoid the build-up that happens inside the bag, and there’s really way to clean it out either.
It’s something you may just have to deal with, as much of a bummer as it is, and just buy new bags every so often. Even with the Volcano, the bags are higher quality and last longer, but eventually they also need to be replaced.
I too found that the EQ bags had a fairly short life, so when I was still using it regularly I ended up using it whip-style most of the time.
The only thing I’ve found that helps extend the life a little bit is to vape the entire balloon as quickly as possible, so that vapor is left in there to condense for a minimal amount of time.
Sorry I don’t have a better answer for you!
Stay up!
-Bud
I have found that turkey bags can be used as they are made of the exact polyester that the volcano bags are made from and they can be picked up at any local grocery store..Hope this tip helps
Even later to the thread, but..
Just use the volcano bags, and make them to size. Don’t know why the OP was messing with the valve, rather than just attaching the bag to the Arizer tube.
Much better than anything else as they’re the size you want.
hey man the best way to fix this is to take it apart (very easy) clean the bag a little and then when you put it back together (also very easy) out it on the second bubble now this is going to make the glass part a bit short… sooo now you have a few good potions use a little chunk of whip to attach a spare mouth piece or cut a longer piece of whip and just use stick that on it
PROS: looks and feels better, fixes clogging issue
CONS: may need to buy more tubing ($3.99)
ya, there’s really no remedy. All i can say is do NOT blow or breath INTO the bag. Your breath is full of moisture and just condensates on the insides of the bag.
I’ve had mine for five years and I absolutely love it.
Couple tips for you or anyone…
Use turkey bags. You can get them at any grocery store. The five-pack is the most correct size IMO. The two-pack is larger. Both only cost a couple bucks. I buy 5 at a time which lasts a few months.
Cleaning parts – I have two glass latch-seal tupperware containers. 1st has mineral spirits and kosher salt. Second has 99% rubbing alcohol. Wear disposable latex gloves. Remove any tubing by running it under really hot water and twisting. Shake the parts in the 1st container (clean the glass parts individually so they don’t break). Remove and rinse under water. Place in second container and shake. Remove, rinse, and dry. The two-step process removes everything with 5 to 10 shakes. I have all my stuff clean and 3 new balloons rubber banded on (use regular rubber bands…way cheaper and easier). I go three weeks between cleaning because I ordered a couple extra parts and screens.
Great review, How hard would it be to fashion a volcano balloon to the q? I have never used a volcano before but I have seen the valve style bags and really like the idea. Would it be possible to perhaps push down the valve and shove the q’s elbow tube into it?
Thanx – I’ve tried a few times but there’s no good way to use the Volcano balloons with the EQ… the tube from the EQ will fit inside the valve but it’s not a perfect seal and vapor escapes when you’re filling it up, which wastes vapor and also prevents the balloon from getting more than about half full.
The Volcano is better at vaporizing the herbs also so the vapor quality is higher, and it also does it faster.
I have another tip for you guys and it has to do with where you place your herbs, check out the second video I embedded above about Elbow Packing
if you are trying to decide between this and the volcano, just remember: you get what you pay for. If you had experience with a volcano and step to this to save some cash, you WILL be disappointed. LOTS of annoying things about this unit: the glass parts get so hot they will burn your fingertips off. Want to load a new bowl? better wait 10 minutes for the parts to cool off before you can. Remote is a total gimmick to make up for the fact that the units actual controls are junky and limited, u have to use one button to constantly cycle through a menu to adjust fan settings. super irritating.
Takes a VERY VERY long time to fill up a bag with vapor. 5 minutes at least, tho their reps claim it takes only 2.5 minutes, which still feels like a frikkin eternity when u are used to a volcano doing it in 15 seconds. Fan is just so weak and junky. This unit isnt really a dual unit because you will only end up using the wand.
DO NOT RECOMMEND
you must have really fair skin cause i have not met anyone even girls that cant pick up the glass parts even seconds after it was used. the bottom glass part of the bowl gets very hot but thats why theres rubber around the top so i really cant see why anyone would have a problem picking it up
Same here, no problems at all with the glass bowl, just pick it up carefully with fingers at top near rubber,
I have had this unit for three years now and no problems! Totally love it, and getting the portable Arizer soon.
would u recommend this one or the portable one for a first vape
Both would make good first vapes, it just depends on how bad you need portability. You’ll get stronger vapor with the EQ.
as long as the screens are clean it doesn’t take any more than a couple minutes to fill a bag, and as long as you grab the thermal coating like ^ said, there arent many problems.
Umm… dude, you are full of crap. It does not take 5 minutes to fill a bag. Yea, maybe the vapor quality isn’t quite as great as the volcano but honestly it’s pretty close IMHO. It’s certainly not 500 dollars less or remotely close. If you pack a full chamber of properly ground herb the vapour is thick enough to choke on. And I’ve never been burned. The Whip is also perfect for chilling and vapign on demand and since the heating unit and herb have some separation you can just leave it going without cooking your product.
Again, the Volcano produces better vapour with it’s enormous chamber but it also requires you put more in for that better vapour in 15 seconds. You pack up the extreme q and set the fan to low you get dense clouds that you know, work, and work well.
Yo. So this is how it be ..
High fan setting = hot glass
There are three fan settings on this unit: 1,2,3
Fan @ setting 1 takes approx. 4 mins to fill up and it aint hot. you can touch that shit afterwards unless you got bitch fingers
I can corroborate that. Exactly 4 minutes to fill the bag on #1 heat setting. Good thick vapor. This is a great unit, especially for the price.
Hey! I’ve just bought the Arizer Q, and im loving it, its my first vape and i can´t wait to try the Volcano.
How do you clean the glass parts and screens in your arizer? is there any tips you can provide?
Great job with the vape criticism!
Nice! Some people try to save what builds up in there but I just clean the parts and screens with rubbing alcohol and then plain water. It’s a little tricky to get in some areas so a poker of some sort will probably make it easier.
Have you experimented with different temps? I just got mine and am curious as to whether the reviews I have read that say different temps give different effects is true or not. What is your recommendation on temperature settings? Thanks for the great videos, they have been invaluable!
Hey Joe,
Yes, I have done testing with different temps and I actually created a whole video about it with some cool magnified herb pictures in it.
You can check that out here: https://vapecritic.com/temperatures/
But to answer your question, yes, it is true that different temperatures can provide different flavors and effects. It’s not really THAT much of a difference though, just keep in mind that its subtle.
I found that for the Extreme-Q the best temp settings are 383°F and 392°F. In my temp video I explain why I set this vape higher than others.
I’m glad you found my vids helpful and thanks for stoppin by!
I’ve just purchased the Extreme Q and watched your video which proved to be an invaluable tool for me..I cannot compare it to the Volcano because I’ve never used one or any other vaporizer..this was my first time…I found it worked amazingly well..I was alone so I didn’t find the waiting time long or annoying at all..I got superbbaked and it was very clean feeling as opposed to smoking.. thank you for your videos..extremely informative and helpful..
Hey thanks for posting and I’m glad you’re enjoying the vape!
Hey Bud, I was just wondering how the Extreme Q ‘whip style’ compares with the Plenty?
Hey sup, check out my EQ vs Plenty comparison video, I talk about how they compare and explain the differences.
Just a quick thank you to the newbie above. Your comments on being a new vaper has convinced me to cross over also. All the reviews, videos and info are Gr8t !!!! Thx to All involved !!!!!!!
My question is regarding charging and inputs. Can I attach a power pack with USB inputs to make this thing usable sitting around the camp site? I know there is a power pack available from Arizer, but I already have a couple of them. I can’t achieve clarity from pics or website and growing weary of digging around the Internet.
I would recommend you mention the charging options, cables and adapters when reviewing. It really annoys me when companies feel the necessity to make proprietary charging units and adapters for their vapes.
Thanks for all the comprehensive reviews, updates and comment forum.